Showing posts with label blogger. Show all posts
U Must be  know.
[1]Google
Main:C++, Python, Javascript
Other: Go, Java, Objective-C

[2] Facebook:
Main: PHP, Hack, C++, Javascript
Other: Java, D, Objective-C

[3] Yahoo:
Main: C++, Objective-C
Other: Python, Java

[4] Amazon:
Main: C++, Java(AWS + Data)
Other: Ruby

[5] Twitter:
Main: Scala, Java, Ruby

[6] Square:
Main: Scala, Java, JRuby

[7] Airbnb:
Main: Java, Scala

[8] Uber:
Main: Node.js, Python

[9] Linkedin:
Main: Scala, Java

[10] Tumblr:
Main: PHP, Scala

[11] Groupon:
Main: Node.js

[12] Quora:
Main: Python
Other: C

[13] Pinterest:
Main: Python

[14] Glassdoor:
Main: PHP

[15] Godaddy:
Main: PHP

[16] Salesforce:
Main: Java, Scala

[17] Dropbox:
Main: Python

[18] DigitalOcean:
Main:  C, C++, Ruby

#Note Points

  1. Big companies choose C++ as their main language for back-end platform, like Google and Facebook and Yahoo and Amazon.
  2. Hot Start-up choose Python and Node.js.
  3. And PHP is still a good choice. Although currently people think that is old-fashioned, but if you dive into PHP, you will find something.
  4. Personally speaking, Python and C++ is a good combination.
 
A worthy way to keep your visitors busy, and to allow them to spend more time on your website is to use “Random Post” button.This button can be placed anywhere in your website, providing your visitors the flexibility...


How to add Random Posts Widget to Blogger

Step 1. From your Blogger Dashboard, Go to Layout, click on Add a Gadget
Go to Layout, click on Add a Gadget

Step 2Add a new HTML/JavaScript Gadget
HTML/JavaScript Gadget
Step 3. Paste the following Highlight code in the empy HTML box:
 <style>
#random-posts img{float:left;margin-right:10px;
width:65px;height:50px;background-color: #F5F5F5;padding: 3px;}
ul#random-posts {list-style-type: none;}
</style>

<ul id='random-posts'>
<script type='text/javaScript'>
var rdp_numposts=5;
var rdp_snippet_length=150;
var rdp_info='yes';
var rdp_comment='Comments';
var rdp_disable='Comments Disabled';
var rdp_current=[];var rdp_total_posts=0;var rdp_current=new Array(rdp_numposts);function totalposts(json){rdp_total_posts=json.feed.openSearch$totalResults.$t}document.write('<script type=\"text/javascript\" src=\"/feeds/posts/default?alt=json-in-script&max-results=0&callback=totalposts\"><\/script>');function getvalue(){for(var i=0;i<rdp_numposts;i++){var found=false;var rndValue=get_random();for(var j=0;j<rdp_current.length;j++){if(rdp_current[j]==rndValue){found=true;break}};if(found){i--}else{rdp_current[i]=rndValue}}};function get_random(){var ranNum=1+Math.round(Math.random()*(rdp_total_posts-1));return ranNum};
</script>
<script type='text/javaScript'>
function random_posts(json){for(var i=0;i<rdp_numposts;i++){var entry=json.feed.entry[i];var rdp_posttitle=entry.title.$t;if('content'in entry){var rdp_get_snippet=entry.content.$t}else{if('summary'in entry){var rdp_get_snippet=entry.summary.$t}else{var rdp_get_snippet="";}};rdp_get_snippet=rdp_get_snippet.replace(/<[^>]*>/g,"");if(rdp_get_snippet.length<rdp_snippet_length){var rdp_snippet=rdp_get_snippet}else{rdp_get_snippet=rdp_get_snippet.substring(0,rdp_snippet_length);var space=rdp_get_snippet.lastIndexOf(" ");rdp_snippet=rdp_get_snippet.substring(0,space)+"&#133;";};for(var j=0;j<entry.link.length;j++){if('thr$total'in entry){var rdp_commentsNum=entry.thr$total.$t+' '+rdp_comment}else{rdp_commentsNum=rdp_disable};if(entry.link[j].rel=='alternate'){var rdp_posturl=entry.link[j].href;var rdp_postdate=entry.published.$t;if('media$thumbnail'in entry){var rdp_thumb=entry.media$thumbnail.url}else{rdp_thumb="https://blogger.googleusercontent.com/img/b/R29vZ2xl/AVvXsEiJLFt26i78a4XKVctd9B7_fhlGanDyn5lApJ8GFl7yCyQbRdbbLxeOhPKP3kzHiIIZvAYmJk94hMSByIx7hPOZy31dsAPeojxL1_dmoTu0DS2mIqgh0-5ubRkyJbpitgy9osLaeFfu0H0/s1600/no_thumb.png"}}};document.write('<li>');document.write('<img alt="'+rdp_posttitle+'" src="'+rdp_thumb+'"/>');document.write('<div><a href="'+rdp_posturl+'" rel="nofollow" title="'+rdp_snippet+'">'+rdp_posttitle+'</a></div>');if(rdp_info=='yes'){document.write('<span>'+rdp_postdate.substring(8,10)+'/'+rdp_postdate.substring(5,7)+'/'+rdp_postdate.substring(0,4)+' - '+rdp_commentsNum)+'</span>'}document.write('<div style="clear:both"></div></li>')}};getvalue();for(var i=0;i<rdp_numposts;i++){document.write('<script type=\"text/javascript\" src=\"/feeds/posts/default?alt=json-in-script&start-index='+rdp_current[i]+'&max-results=1&callback=random_posts\"><\/script>')};
</script>
</ul>

Replace 5 with the number of posts you want to be show.
For bigger thumbnails, change the pixels in red from width:65px;height:50px

Step 4. Press Save and you're done! Enjoy!
Thankyou for visit this tutorial

Latest 2014 How to Make free 7000+ backlinks by Different website automatic

backlink create automatic

Backlinks is very important for off page seo. I have already mentioned in my previous article what is backlinks and why it’s important. If you don’t want to buy a backlinks so if you searching for free backlinks so you are right place. So let’s start 
IMT Website Submitter - submits your website to 2,500+ places for FREE! 
IMT Website Submitter submits your website/blog to 2,500+ different places. All these 2,500+ websites are manly "who is", "about us", "website statistic", etc. type of services.
Automatically add your website link to 101 sites
backlink create automatic

Google offers Free Website with .in domains in India.

Google is really taking Indian Market very seriously – According to an announcement today by Google has launched -India Get Your Business Online – initiative that will offer Indian Small & Medium sized Businesses completely free website along with a .in domain name.

How to avail free Website / domain offer from Google in India.

Just head over to India Get your Business Online website, choose your domain name, fill up a form giving some of the details and you are done.
Get India Online | Google offers create Free Website in India
free domain name | Google offers create Free Website in india by india get online

What do you get by indiagetonline.in?

  • Free: The domain is free for 1 year, and it’s free to maintain your website for 12 months.
  • Quick: The website tool takes 15 minutes from sitting down to being found online
  • Easy: You don’t need to be a tech whiz to get started. All you need to start is your address, phone number, TAN/CIN or PAN to verify you as a business
  • The website is simple because customers are looking for simple information online
  • Gives you your own .in domain
  • Other features include photos/logos, integration with social media platforms
  • You get a Google Apps account – free personalized email ids
  • If you want to make your website work harder, you’ll have access to steady stream of free tips and tools from the Getting Indian Business Online team and a free coupon of worth Rs. 2500 INR advertising trial from Google AdWords to help promote your site.
  • After the first year, SMBs can choose to pay a monthly pay-as-you-go to maintain their website using hostgator.
  • At the end of the first year, they’ll have to pay a nominal charge if they wish to renew their domain name. They can cancel their website at any time.

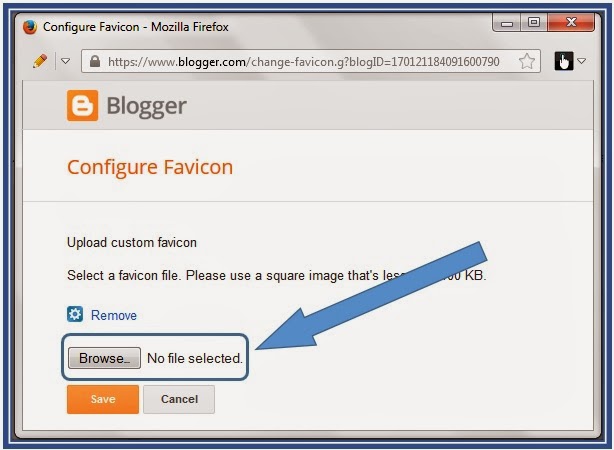
How to change blogger fevicon with our custom fevicon !

how to install fevicon in blog  we are help you change you fevicon with you logo/image.simply you install fevicon by below steps.now follow steps

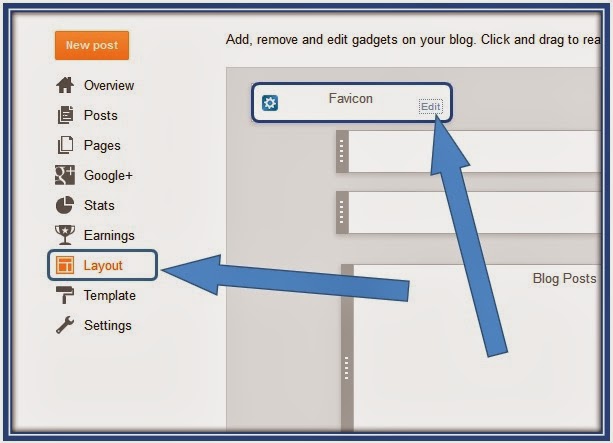
change my fevicon in blogger
1. Open your blogger id & select layout option.
how to install fevicon in blog/blogger
  • Now you have to remember these things while adding favicon
  • Favicon site is not greater then 100kb
  • And your favicon sized should be square in pixel like 16x16 or 32x32

           (If the setting is not the same as i said then it may cause the problem in installing the icon)
change your blog url image

change fevicon by googleagra.com
Now simple save your setting and you are done. You must restart your browser to works fine, may be there is problem in viewing the icon, you must clear the browser history.
If there is any problem let ask in comment i am here to help you out.

how to add new year fireworks effect on my blogger ?

Follow below steps.....add fireworks effect on blogger blog

STEP 1 - Go to Blogger account > Dashboard > Layout > Add a gadget, Click it.
STEP 2 - In gadget box, Click on Html/Javascript.
STEP 3 - After click on Html/Javascript, a new tab will open. Paste the Below Highlight code  and save it.
<script type='text/javascript' src='http://dl.dropbox.com/u/80435960/FireWorksNewYear.js'></script>

Now enjoy this. Any help comment below.

Add Facebook Like Buttons In Blogger

How To Add Facebook Like Button In Blogger?

  • First go to Blogger > Template > Edit HTML
  • Check the expand widget box
  • Search for <data:post.body/> using ctrl+f

Style #1: Button With Count


facebook button with count
<b:if cond='data:blog.pageType != &quot;static_page&quot;'> <iframe allowTransparency='true' expr:src='&quot;http://www.facebook.com/plugins/like.php?href=&quot; + data:post.canonicalUrl + &quot;&amp;send=false&amp;layout=button_count&amp;show_faces=false&
amp;width=90&amp;action=like&amp;font=arial&amp;colorscheme=
light&amp;height=21&quot;' frameborder='0' scrolling='no' style='border:none; overflow:hidden; width:90px; height:21px;'/> </b:if>

Style #2: Button Without Count


Facebook like button without count
<b:if cond='data:blog.pageType != &quot;static_page&quot;'> <iframe allowTransparency='true' expr:src='&quot;http://www.facebook.com/plugins/like.php?href=&quot; + data:post.canonicalUrl + &quot;&amp;send=false&amp;layout=standard&amp;show_faces=false&
amp;width=450&amp;action=like&amp;font=arial&amp;colorscheme=l
ight&amp;height=35&quot;' frameborder='0' scrolling='no' style='border:none; overflow:hidden; width:450px; height:35px;'/> </b:if>
Note: If you want to show this button below of your post title then paste one of these just above <data:post.body/> 
If you want to show this button below of your post then paste one of these below <data:post.body/> - See more at: http://www.googleagra.com

how to Add Popular Posts Widget In Blogger

Beautiful Popular posts Widget For BloggerPopular posts widget is also in blogger widgets   as default but to give it a new look you need to   make some changes in CSS coding. Today we   are providing a beautiful popular widget for   blogger which have a great look and have an    awesome hover effect. 


How To Add Popular Posts Widget In Blogger?

To add This widget in Blogger you need to follow these simple steps:-
  • First Go To Blogger > Layout
  • Click on Add A Gadget
  • Now Click on Popular Posts widget and make the follow changes as showing in picture
  • popular

  • Make the same changes as shown above in picture
  • And Click on Save Button
  • Now the second part is add the CSS code for this
  • Go To Blogger > Template
  • Click on Edit HTML

popular 2
  • Click on Black Arrow to expand the coding
  • Now search </b:skin> using ctrl+f
  • Above </b:skin> paste the following code
/*--- MBW Popular Posts --- */
.popular-posts ul{padding-left:0px;}
.popular-posts ul li {background: #FFF url(http://1.bp.blogspot.com/_7wsQzULWIwo/S
modosCuJCI/AAAAAAAABh4/ZSXbVW9Qpa8/s400/261.gif) no-repeat scroll 5px 10px;
list-style-type: none;
margin:0 0 5px 0px;
padding:5px 5px 5px 20px !important;
border: 1px solid #ddd;
border-radius:10px;
-moz-border-radius:10px;
-webkit-border-radius:10px;
}
.popular-posts ul li:hover {
border:1px solid #6BB5FF;
}
.popular-posts ul li a:hover {
text-decoration:none;
}
  • Now click on Save Template and you are done !

Create a Drop Down Menu in Blogger

  1. Go To Blogger > Design > Page Elements
  2. Select a HTML/JavaScript Widget just under the header and paste the following code inside it,

<div id='Gagranavbar'> 
      <ul id='gagranav'> 
        <li> 
          <a href='#'>Home</a> 
        </li> 
        <li> 
          <a href='#'>About</a> 
       </li> 
        <li> 
          <a href='#'>Contact</a> 
        </li> 
  <li> 
           <a href='#'>Sitemap</a>
            <ul>
               
<li><a href='#'>Sub Page #1</a></li>
                <li><a href='#'>Sub Page #2</a></li>
                <li><a href='#'>Sub Page #3</a></li>
              </ul>
 

        </li>
      </ul> 
    </div>
Replace # with your Page Links and the bolded text with relevant page names. The yellow highlighted code is responsible for the drop down menu. You can copy and paste it under any tab you want just before </li>
To add another tab just paste this code above </ul>

How to add CCTV camera on your Blogger

1. Design
2. Layout
3. Add gadget
4. Copy below text and paste in HTml/Javascript
Start copy Highlight portion.
<script language="JavaScript" src="http://yourjavascript.com/23260112942/mrthangming-cctv.js" type="text/javascript"> </script> <script language="JavaScript" type="text/javascript"> cot("https://blogger.googleusercontent.com/img/b/R29vZ2xl/AVvXsEjrRiEtqBgv-QhcqpoFGwS8WX_SvboGqJJW-BF5L_zGGQTawvA8twlcgvHomW3YExaNN608arSvqrMJcjwDEkR257b-BHT97GlshFjW-gsNJ3jzS_Aq0qz1beW1Su5JpWMLOYMwoKMNk_U/s1600/cctv.gif")</script>

How to use Custom url in Google Plus Profile

Google Plus has created a lot of buzz since its launch in 2011.It is reported that Google+ now has a total of 250 million registered active users.

1. Google+ officially offers custom URLs

Update: Google is offering vanity URLs for verified accounts such as football stars or car manufacturers. You just need to type in short URLs like “google.com/+samsung” or “google.com/+toyota” to reach those pages.

2. Google Profiles

Google Profiles is now redirecting your profile page to Google+ Profile if you have one. So you can create a profile URL like this:
However, you can set the username of your own because Google Profiles uses your Google username for this URL. This is also a drawback of this solution, you might have to create a new Google account to get your desired Profile URL.
You just need to go to this page to create your profile, then click on the option Edit your profile – Profile URL. Google will give you 2 choices of Profile URL, you can choose the one with your username and save these settings.
Gplus url
Update: Google don’t allow access to this page anymore, but you still can get a vanity URL using your own Google ID. So, your URL will be https://profiles.google.com/your_username.

3. Gplus.to

Gplus.to is a service that shortens your Google Plus profile into a neat, easy to remember link. To create your shortened URL, all you have to do is giving Gplus your Google+ profile ID, it will generate an URL in the format gplus.to/yourusername. You can set whatever name you want as long as it is still available. Here is my custom URL:


Facebook’s Mobile Phone: Three Reasons to "Unlike" This Strategy

facebook phone
Facebook is set to announce this Thursday the release of the Facebook Phone in partnership with HTC. According to the latest mobile report from The New York Times, the plans are to manufacture the first smartphone designed around the total social/sharing experience that Facebook enables. Maybe it’ll be called PhoneBook? Ugh.
On paper, it’s a really good idea. More than a billion people use Facebook on a regular basis to connect with friends, weigh in on political ideas, and just generally brag. And as it turns out, MOST of them are posting, liking and commenting from a mobile device.
However, this announcement is NOT on paper. It’s real. And on most levels, it’s kind of silly. Facebook has become one of the most visible, one of the most recognized, and one of the most important brands on the planet, (although, according to the stock price relative to the IPO, NOT one of the most valuable.)
And yet, with all the Stanford MBAs on staff in their marketing and operations departments, is there anyone there voicing an opinion that this is a thinly veiled brand extension that's simply designed to appease shareholders with a strategy to create more revenue streams? Because, let’s face it folks, that’s what it is.
The subtext of the “exciting” and “new” direction for Facebook is to have another screen for advertising. Period. Facebook’s entire valuation was built – however hastily, however erred – on the idea that a billion+ eyeballs is a road paved with advertising gold. Add another screen, and you can charge another scale. The new rate card must be getting a design makeover just like the news feed.
But that road to gold, being paved this week with this mobile announcement, is pocked with obstacles. From a marketing perspective, these three obstacles indicate a likely FAIL and another rough year for Zuck & Co.

Blogger Sitemap Generator Tool

Last year Blogger added automatic sitemap generation functionality to their blogger or blogspot platform. It means, your blogspot automatically generates an XML sitemap file which automatically changes its contents, when you update your blog. You can access the sitemap Page of any blogspot blog by visitinghttp://www.blogname.blogspot.com/sitemap.xml . 
blogger sitemap tool
Blogger has an Automatic Sitemap Generation Functionality which automatically creates an XML Sitemap file athttp://www.yourblog.blogspot.com/sitemap.xml.  You can submit this Sitemap file to Google Webmaster Tools or any other place without any issue. However, When you switch to Custom Domain in blogger blog i.e something like http://www.yourblog.com,http://www.yourblog.in etc, the automatic XML sitemap generation stops working. It means, it only works domains like http://www.yourblog.blogspot.com. At this time, you need to manually configure XML sitemap for your blog.

How to use Blogger Sitemap Generator for better SEO?
You can do this by given method.
Using the Blogger XML Sitemap Generator by Digital Inspiration
  • Visit http://ctrlq.org/blogger/
  • Type the url of your Blogger blog in the filed provided. You can use either blogspot.com address or your custom domain.
  • Once done, click on “Generate Sitemap” button. 
  • Sign into your Blogger Profile and navigate to Settings>>Search Preference.
  • Just click on “Edit” link which is placed just beside the [Disabled] option in “Custom robot.txt”  option. 
  • Enable the Custom Robot.txt content by choosing the “Yes” option.
  • Now, Paste the Generated XML code(Which was generated in 3rd step) in this box. 
  • Once done, click on “Save Changes” button and you are done. After doing this, there is no need to submit the Sitemap file to Google Webmaster Tools. Google Crawler will use atom.xml and will automatically index all of your contents.